Thursday, March 8, 2018

Sharpness and Quality

Sharpness and Quality Investigation


Things to Remember to Get Crisp Footage:
  • First control the focus area of the camera. Shallow depth of field will help produce a sharper image with a blurred background and give a nice cinematic look.
  • However, if you need an establishing shot or a clip with a wide depth of field, it is crucial to have the Aperture at F/8 or higher. This way enough light will come into the camera sensor and the whole shot is visible.
  • A big mistake cinematographers make is using the in-camera sharpness setting. This creates image grain and noisy footage and even a loss of detail. This will also make any coloring or visual mistake in the clip harder to correct in post production.
  • Its important to film in a flat picture profile. I personally have already downloaded a C-log picture profile onto my camera at home to really help me get flat footage. Lots of cameras don't have a C-log picture profile but you can still get flat footage by lowering sharpness, contrast, and saturation in your settings. I don't know if Bomboy's cameras have C-log.
  • Flat Shots = Profession
  • Flat footage does not look good right off the back but it makes editing in post production much easier because you are not restricted by colors, exposure, or contrast that get in the way when you aren't filming in a flat picture profile.
  • Sharpening too much in post production can create lumpy footage.
  • Keep editing simple and use a high bitrate when exporting footage (minimum of 25mps)
  • When it comes to lens you are going to want a wide aperture usually between F/1.2 - F/2.8 in order to get crisp cinematic shots.
  • Aperture, Iso, and Shutter Speed are EVERYTHING. 
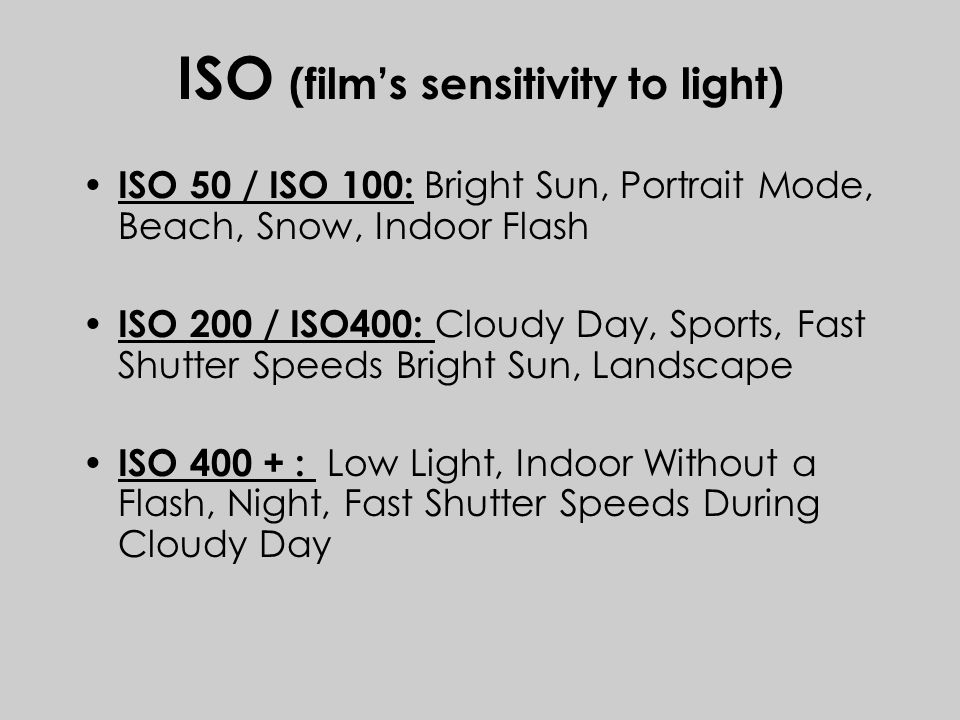
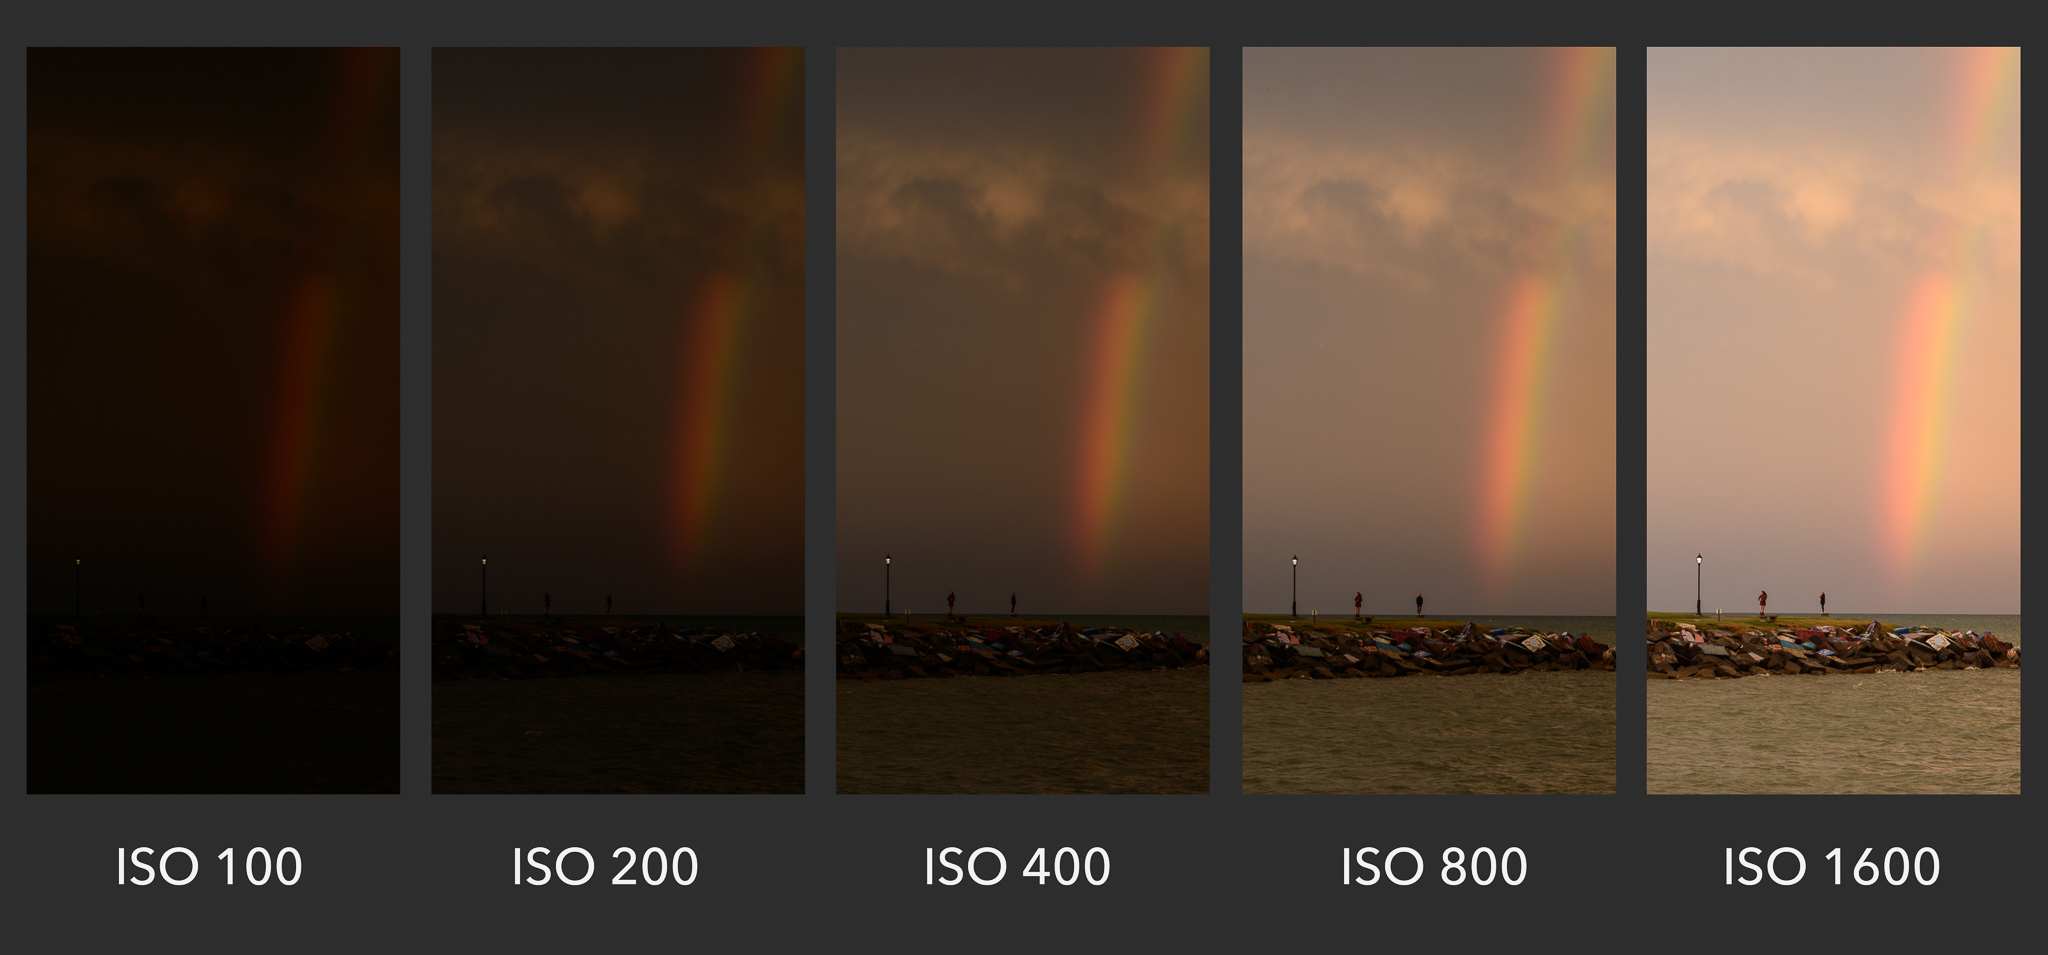
  • Higher ISO = Brighter. But using high ISO is risking getting Image grain.
  • Lower ISO = Dark. Increases contrast and risks getting image grain 
  • It's all about knowing your camera and getting the perfect ISO, Aperture, and Shutter Speed levels.
  • 1/50s recommended for 24fps (Shutter Speed)
  • You can change Exposure with both ISO and Aperture.
    • F/22 = Dark with deep depth of field.
    • F/2.8 = Bright with shallow depth of field.
  • Usually best to stay below ISO 1600 or else footage will be grainy.
  • When shooting in the dark:
    • Shoot with Aperture of F/2.8 and ISO 1600
    • Grainy footage = Over Exposed
    • Flickering = Wrong Shutter Speed
  • In post production you can get rid of some image grain by lowering highlights a little.

Monday, March 5, 2018

Storyboarding Investigation 2

Storyboarding Investigation 2

The History Of Storyboards
Walt Disney animator Webb Smith first used storyboarding during the early 1930s. Smith used the idea of drawing scenes of the Disney short “The Three Little Pigs” on separate sheets of paper and pinning them up on a bulletin board to tell the story in sequence. One of the first live action films to be completely storyboarded was “Gone with the Wind”. Storyboarding became popular in live-action film production during the early 1940s, and became standard for the previsualization of films. Today it is an expected part of the pre-production process. Storyboards can also assist people working on the set of a film, to see exactly what will be happening in the scene. Some directors, such as Martin Scorsese, use storyboards for the majority o

a
f their films. Other directors, such as the Coen brothers, have a storyboard artist on staff to create storyboards for every shot. Other directors may use storyboards only for complex action scenes. What is seen on a storyboard must be consistent with what is happening in the shot. For example, if you envision a close up shot of someone’s face, the storyboard should show the person’s face very close up; the face should fill most of the screen. Storyboarding helps you visually see how your shots will fit together. Remember, if you don’t understand the message, no one will. Creating a storyboard is a major part of the pre-production process and will aid in organizing your ideas, making sure that the audience understands your intent. Shot selection , camera movements, and audio notes on the storyboard also help the audience understand your intent.

The Style Of Storyboards 
There are multiple styles of storyboarding but simple sketching is good for a beginning storyboard artist. There are a few ways to build one, either with pencil and paper, or on the computer, but it really all depends on your need and skill level. Depending on the time frame of the production, you can gauge how much detail is needed on the board. Often times simple sketches are able to communicate the story. Although more detailed storyboards typically leave your audience with a greater understanding of your story and goals.

Below are my storyboards so far. I added times on them because I have an audio recording from Jack's interview so I was lining up my shots with what he was saying.

1

2

3

4

5

6

7

8

9

Worklog:
Monday- Storyboarding
Tuesday- Color correcting footage
Wednesday- Degraining and Denoising footage
Thursday- Cleaning up and assembling clips
Friday- Storyboarding B-roll.