Sunday, November 19, 2017

Photoshop

Photoshop Investigation

I have never used photoshop before so this week was all new to me. It kind of reminded me of the old painting app on dell computers but was obviously more advanced and much less straight forward. I struggled for a few days as I felt my way through the program, eventually I turned to watching youtube videos in class and at home to further expand my understanding and give myself a background before I started this project. I've always found making logos to be one of my favorite things and I enjoyed learning a new way to make them on a new application.

My idea is completely original. I did watch numerous videos on how to create logos but I wanted to make something that I came up with, not just following the steps of another person's ideas. I did learn a lot about some common themes with digital logos, the first being a shape that encloses the text. This defines the area that you want viewers to look at and gives a kind of unity to the project. Rather than just having text, by adding a shape, the logo becomes more complex and professional. Secondly most of the logos had some kind of emblem, I wanted to make one but I found it extremely difficult to work with shapes in the unfamiliar program. I also noticed that some logos had one or two letters that were bigger than the rest and kind of acted as the logo. So instead of just frustrating myself with messing around with shapes I went online, found a really cool text that made the letter "A" look unique and i downloaded it into photoshop. The font made the letter so different that I used it as my emblem. I then attached the two D's to the "A" ad to each other. I had to make a bar out of i's in order to fill the gap at the top and connect the two D's. Then I added the "LIFE ON" part and thought I wanted to put in somewhere that connects it to the rest of the project. Understanding that people read from left to right I wanted to incorporate the words on the left side so people would read the logo as "LIFE ON ADD" instead of some other wording. I also did this in order to avoid any confusion in that respect.  So I put it in the letter A which brought the words together and into the piece while also keeping them to the left side.

I was relatively satisfied with the basis I ha created so far but I realized it looked flat and not really up to par with other works I looked at. So I added depth by duplicating the words and letters, placing them behind the previous layers, and changing the color to a dark blue/grey, my favorite color. It was starting to look better but I wasn't satisfied, I had this great gradient on my background but the text still didn't really look 3D so I did some research on how to make shadows. I do the idea of the eclipse shaped shadow by one of the logos that I looked at but I didn't know how to create it. My research failed in offering me a solution to my problem so I continued to mess around with the program. First I tried drawing out a thin eclipse and feathering it out but it didn't give me the effect i wanted. So naturally I asked my teacher and he showed me that by double clicking on a layer a panel shows up, in the panel it gives workers numerous options on how they can edit the appearance of a layer. One of the options was a drop shadow, so i applied it to my eclipse layer, dropped the show lower from the layer, moved my shape out of the screen so it wasn't in the frame, and finally feathered and smoothed out the shadow to what I desired.

Worklog
Monday: Today I started to fool around with photoshop but was frustrated because i couldn't find the tools I was looking for and didn't really know how to use them
Tuesday: I looked at youtube videos on how to create logos in Photoshop and started to become more familiar with the application.
Wednesday: I went back to messing around with photoshop and found it much easier to create something with my new knowledge. 
Thursday: I did some more research at home and started to draw out ideas that I wanted to make in Photoshop. However when I got to class i ditched everything I planned out and just had fun creating. By the end of the period I had the large "ADD" letters down and the "LIFE ON" part in the "A". I also made a background with a radial gradient.
Friday: I finished the Logo and am planning on animating it in illustrate next week. I added depth to the text, added the box, and put a gradient on the "A"

Monday, November 13, 2017

Lavalier Mics

Lavalier Microphones

About Lavaliers:
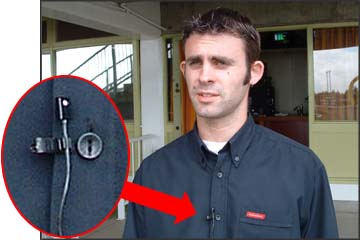
Lavalier Microphones are also known as a lavalier, lav, lapel mic, personal mic, collar mic, or even a neck mic. A microphone is an instrument for converting sound waves into electrical energy variations, which may then be amplified, transmitted, or recorded. Specifically, a lavaier microphone is a small microphone that attaches to a subject in order to allow that person to have their hands free while they are talking. It is used when the normal aesthetic of a visual microphone is not wanted, typically in movies, tv shows, theaters, and even in public speaking applications. Usually the microphone is attached to a small clip that allows someone to clip it onto their shirt or jacket. Some lapel mics can be wireless, however, they are expensive so most people use ones with wires. The wire can easily be hidden under the speakers shirt or jacket or can be manipulated so it is not in the frame of the camera shot.

History:
The lapel microphone dates all the way back to 1932 and the device ranged from suspended microphones on a belt around the neck in 1941, and telephone operators and air traffic controllers using microphones that rested on the chest and were secured by a strap around the neck. In the 1950s, some microphone models were officially designed to be hung on a string around the neck.Some of the mics were made with condenser diaphragms, ribbons, moving coils, and carbon buttons. The name comes from a small microphone that could be hooked into the buttonhole of the lapel of a coat. The term lavalier originally referred to a pendant worn around the neck. Its use as the name of a type of microphone dates from the early 1960s.


How do mics work:
https://youtu.be/PE6Qn4ZiEyo

Work Log:
Monday: watched a few youtube documentaries on ADD
Tuesday: Worked on question sheets for interviewees
Wednesday: Worked with lavalier microphone on camera
Thursday: Worked on question sheet for interviewees again
Friday: Storyboarded B-Roll footage ideas


Monday, November 6, 2017

Mp1 summary 2 week 2

MP1 Week 2 Presentations Summary

Tessa-Film on Anxiety
Tessa is currently working on a film about human experiences. This year she wants her concentration to be on human experience and how they shape people. The film she is working on is about anxiety and how in a normal, everyday situation and person with anxiety can be in these situations and experience a severe anxiety attack. The film takes place in a classroom and a student with anxiety gets called on to answer a question in class, being called on provokes the anxiety attack. The thoughts of the character will be displayed on the screen so they are visible to viewers. And as the anxiety attack intensifies and subsided the thoughts become more or less extreme with the characters emotions. She also wants to incorporate the sound of a heart beat as the audio and wants the heart beat to speed up and slow down with the anxiety attack. She basically wants to make a film that allow viewers into the world Of someone with anxiety and to visually show what an anxiety attack looks like to the victim

She has done a lot of research  and planning in order to get the film right. This includes her research of different colors that represent panic, camera angles that create suspense, and numerous other techniques that can evoke anxiety into the viewer. So far she has done blog posts on these things and also has started to plan out her shots and storyboard. On top of these she has also written a script. One of her challengers so far has been finding enough people to fill the space in the background of the film in order to make it look like an actual classroom. I too have had problems with finding people to film so I can relate to this struggle.

Overall I think she has done a lot of research and she is doing everything on her own. She’s made more progress on her own then other people have who are part of bigger groups. I’m excited to see how the film comes out and how she incorporates all these ideas she has into it.

Worklog:
Monday-presentations and notes
Tuesday-presentations and notes
Wednesday-ended presentations and notes. And then watched YouTube videos on camera setting involving quality of video because I’m still having problems with my camera at home.
Thursday- researched how to use a lavalier mic so I can use one in my next interview and not worry about wacky audio.
Friday- absent


MP1 Presentation Summaries

MP1 Presentation Week 1

Trevor/Tyler/Noah-Film Project Summary
This group is working on a film about a high school male student who attends a party and subsequently becomes addicted to drugs. The film apparently does not glamorize drug use but rather teaches a lesson abut the dangers of addiction. Some things that the group has been researching last marking period is the use of the multi-cam technique. This is when multiple cameras are use, usually three, in order to capture different angles in the same scene so you only have to shoot once. I myself have explored this idea and will most likely be using the technique in my next film. I could probably ask this group to help me set it up since they too have researched the topic and I will need extra hands on set.

Trevor, the group member who focused on multi cam, also looked into script writing along with fellow group mate Noah. They said that they found it hard to come up with ideas for the films alone but since they were working in groups it made the process easier because their were numerous brains working together and adding suggestions and ideas. I am a solo team so I have yet to work with anyone, however, I don’t find it hard to come up with films because I have quite and imaginative mind. But I do enjoy peer review and to get tips after I have made the film so I can improve my next one.

Tyler another member researched directors and actors to take his understanding of on screen performances to the next level. I found this surprising since this was a digital class and not really acting. But I guess it does play into the quality of the film they are producing and is a major aspect in making the film look cinematic. Tyler also feels uncomfortable in front of a camera so a lot of this marking period was done to make him feel more comfortable and to help him portray a character that’s is relatable and can satisfy the viewers.

Overall interesting bought the group has made a Some progress over a long period of time. They’ve had months to work and haven’t even come up with a title for the film. I don’t know if they aren’t showcasing all the work that they have done or this is all their work but it’s not that much for how many people they have. The planning process can take a long time and hopefully they now know how to get it done and next time it will be quicker. Their presentation of their work was ok. Nothing special but not bad. I’m excited to see how they make this film and to see how they made it with in school limits when they have such an intense topic.

Worklog:
Monday-presentations and notes
Tuesday-presentations and notes
Wednesday-presentations and notes
Thursday-presentations and notes
Friday- presentations and notes

Thursday, October 19, 2017

Marking Period Blog Post


Life on ADD
By Brice McInroy


Life on ADD is an interview styled documentary about what its like living with Attention Deficit Disorder, told From successful business woman Dr. Elizabeth Bergey, and produced by amateur cinematographer Brice McInroy. Dr. Bergey has had ADD her entire life and knows all too well the many disadvantages, and few advantaged of living with the disorder. In this 6-minute interview she gives viewers a brief glimpse into her life on ADD.


Exploration of Ideas
Throughout my life I've had an itch inside me that never seems to go away. It nags at me and stings until I finally scratch it. That itch is my need to discover and explore new information, and to keep digging until I understand that topic fully. The constant need to keep my brain running and my want to gain knowledge has led me right into this film style.
The idea didn't occur to me until the start of school this year. I spent a long lethargic summer creating meaningless travel films, that were actually documentaries in their own form. But it became repetitive, similar, and overall boring. Id start a project and realize I was capturing the same shots that I had in previous films. I was becoming tired of landscapes and scenery. So I came into class with an open mind. Then one of the first films we watched in class was an animated documentary over a recording of an interview with an alcoholic, drug dependent, former artist called "Ryan" by Chris Landreth. My need for something knew, my exposure to the film and my hunger for exploration combined in my head and from that point on I was sold on creating Documentaries.
I myself have severe ADD or Attention Deficit Disorder and there for I was really curious to see how the disorder affects other people. So an idea started forming in my head, What if I created a documentary by interviewing people with ADD? And so I began to obsess about what I was going to do and how I was going to do it, and that helped my itch fade away as my void started to fill with new information.
Below is some information I researched in order to start my journey to create a documentary.

Planning/Production

I started the project by researching different documentary styles and watching countless of them. I
began to jump from idea to idea in an organized and scattered way and it was extremely unproductive. I was like a puppy trying to play with all the toys at once while also picking their favorite. First I wanted to do a animation in light of recently watching "Ryan", but I quickly found out that drawing on a computer was not my forte. So then my interest shifted to docudramas, where a true story is told from false characters and settings. I worked with that for a little and more ideas started to shape in my head. As I was watching "Trophy Parents" a documentary about crazy parents of athletes I noticed the mixture of interviews, action shots, and other cinematic scenes. I liked the way voices flowed over changing clips and thus spurred my final project idea. I was going to interview people with ADD, while also capture who they are as a person outside of the interviewing room.
I began to draw out story boards and different angels I wanted my camera/s to be at while filming my subjects. Reality hit and I realized I was a one woman crew and could only use two one camera at a time while filming. So I went back to my drawings and picked a classic interview style close up where the subject is lined up using the rule of thirds.

Then I wanted to work out my lighting, so I researched different interview lighting techniques and where to place lights, and I also made a blog post about it. Unfortunately, I did not have any soft lights or fancy light boxes at my house so I improvised. I took a cardboard box, cut out the flaps, put an LED light facing the opening, cut out a hole in the back for the wire, and then covered the front opening with a pillow case to defuse the light. It worked out really well for my fill light because it didn't illuminated the background that much, especially when it was placed close to my subject. Then I used a regular desk pointer light for my key light. This also worked out well because I was able to point it at my subject and only my subject, once again leaving the background almost completely dark. But I wanted to see my background or else the shot would look bland so I turned on a bed side table lamp in the back which acted as my back light and gave a nice glow to the background.
The Backlight I used also went with another topic I studied which was creating a blurred background and Bokeh Effect. The Bokeh effect is when a camera is out of focus and there are lights in the frame, because of the blur the lights defuse and create soft circles. With this in mind I previously planned to include the Bokeh Effect into my blurred background, and the bed side table lamp seemed to have achieved this effect.

Another thing I did while planning and producing was conduct a sheet of Interview questions I might ask during the film. I wasn't going to read off the sheet like a script, but rather refer to it if the interviewee got off task, or if my mind blanked for a second or two. This I found was extremely useful because it got into my head what I was trying to achieve with this film which was to share the story of a person with ADD while also educating the viewers and giving them a glimpse into my subjects life.

Evaluation/Integrating
I didn't use a lot of previous knowledge for this film other than basic camera settings and techniques and my understanding of what its like living with ADD, which I had to constantly remind myself to not allow my own personal experiences get in the way of how I was going to illustrate my subjects experiences. However, I did learn a lot while planning, producing, and editing this film. I learned countless techniques to shoot an interview. I think the most important was the use of multiple lights and cameras. I was only able to use one camera because I was limited by my resources, but through watching other interviews and documentaries I saw the importance of using switching from one camera angle to the next while a subject is talking. I really like how easily films flowed when producers used this technique. Next time I shoot an interview I will try to get a camera crew together so that I can achieve this style.

Another really important thing I figured out while editing was how to clean up audio and get rid of background noise. I shot my interview with a shotgun mic which unfortunately picked up a lot of humming from the fan and air conditioning. I know for next time that in order to avoid this then I would have to use a lavalier mic. But I had already shot the same interview two times because of other complications and I did not want to shoot it another time. So, I looked up how to get rid of background noise in adobe audition. I was presented with numerous solutions to which all I tried and failed. I was spending hours trying to fix this major problem and was trying to find solutions on the internet. But I couldn't, none seemed to work. So, I took my opening audio clip into adobe auditioned and started to familiarize myself to the app. Countless hours of messing around and I started to understand the inner workings of audio and sound. I then created my own solution to the problem.

I selected an individual audio clip in Premiere Pro> went to "edit" on my tool bar> pressed on "edit in Adobe Audition. This brought my audio clip up in the audition app and allowed me to edit that part of my audio. Then I highlighted a section in my clip where all you could here was the background buzzing that I was trying to eliminate. I then clicked on "effects", scrolled down to "Noise Reduction/ Restoration", and clicked on "Capture Noise Print". What this did was save that highlighted section so I could use it later. Then I went back and highlighted my entire audio file and went back to effects>Noise Reduction/Restoration> and then to right below "Capture Noise Print" to "Noise Reduction Process". This brought up a separate panel that looked like a scatter plot with three different colored points. (See picture) I then had to manipulate the solid line, much like how you would manipulate a RGB curves line while color grading, until then yellow and green lines overlapped. This is would get rid of the background buzzing and only slightly warp the voice of my speaker. Basically by saving the humming sound I could put it into this program and line it up with my entire audio clip, which would then delete the humming with in that audio range.

I've learned not only techniques, styles, tricks and tips about interviews and documentaries through making my own, but I've learned how to solve my own problems and learn from my mistakes which I think is one of life's most valuable lessons. I've gained so much knowledge while planning, producing, and editing that I am beyond excited to put that information to use in my next film, and to fix those problems I previously encountered.


Monday, October 16, 2017

Worklog 3

Weekly Worklog #3

Monday- No School

Tuesday- Absent

Wednesday- I've been having a lot of trouble with my camera at home. I shot the interview 2 times already and each time my footage is coming out grainy and pixelated. So today I researched ways to fix this including, adjusting iso and aperture, and am going to try them out tonight.

Thursday- After another unsuccessful shoot with my camera at home I decided to check out one of the cameras from the school, along with a wide lense to get a nice blurry background. I spent the class messing around with it and seeing how the auto focus and manual focus works and how blurry I can get the background. Hopefully this will work and it will be the last time I shoot this interview.

Friday- Absent