Setting up an Interview

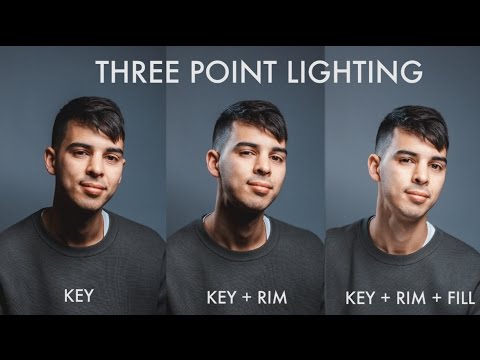 Lighting- First turn off all artificial light in the room in order to see where the natural light is coming in. Then place lighting accordingly to subject and the feeling you want to give off to your viewers. Use soft light in order to make the subject look friendlier and respectful. Most filmers use soft light set ups for informative interviews or to try and make the subject look innocent. By using hard light a different feeling is presented, usually one of suspense and makes the subject look like a villain. One way of using hard light i by making a silhouette of your subject by placing the light behind them instead of in front. This masks identity and makes viewers want to know the face behind the screen. By using a hard light set up instead of soft you can also illuminate the face and create hard shadows and cuts that give off that villain vibe again. For my concentration project I will be using Soft light since I am retrieving personal accounts of life experiences and want to make my subjects seem familiar and friendly. I also will be using the 3-point lighting set up in order to fully illuminate the face.
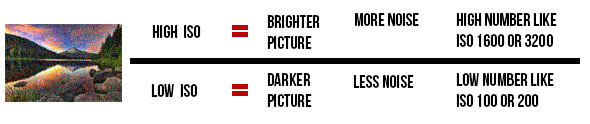
ISO- Thursday afternoon I attempted to record my first interview of Dr. Bergey and capture her life account of living with ADD. But I didn't know my camera or many of the settings very well so I made a rookie mistake. My ISO was turned all the way up to 6400 which I have learned you should rarely ever shoot in. ISO measures the sensitivity of the image sensor. Normally a high ISO would be used to shoot in low lighting to make it easier on the camera to pick up video better. But in afternoon lighting and the use of a 3-point lighting setup my footage game out grainy with visual noise. The camera became so sensitive that it looked like colors were just freely moving across my footage when I uploaded it to my computer. Now I have to reshoot the whole interview in a lower ISO, lower than 500, in order to avoid visual noise, pixelation, and grain.


Focus- Obviously Focus should be on the subject during an Interview, but in order to get a professional looking clip the background should be blur. I have been using a wide lense with lower zoom. This type of lense is used to film and focus on close up objects. Which is perfect for my needs. First I place my camera on my tripod, lined up my shot, and focused on my subject. But I wasn't achieving the blended smooth background I was looking for. So I got on youtube and looked up ways to fix my problem. The simplest fix, zoom in and then focus. I went back to my subject, placed my camera farther back in the room, zoomed, and focus. By simply zooming and refocusing I was able to get a blurred background and achieved a really professional looking clip(until a screwed up my ISO).
No comments:
Post a Comment