Tuesday, December 19, 2017

Color Correction & Color Grading

Color Correction is the process of changing every clip in a sequence to get good exposure and good Neutralization is the process with in this process when a clips colors are neutralized and flattened to allow an editor to color grade footage with a clean slate, bringing out the colors and schemes they want to instead of working with what is already there. Temperature is adjusted by implementing more orange to even out a cold bluish clip or vise versa, the allowing the editor to come in an give it the temperature they want to convey in the shot. Instead of editing footage based on how it appears to the human eye, SCOPES help show the balance of colors and contrast and make correcting easier by leveling out such features.
light.

Color Grading is done after color correction and is the creative process of adding and manipulating colors, lighting, and exposure again, but in this case instead of flattening and neutralizing, color themes, schemas, gradients, and more are introduced and give the footage a specific feel. This is a purely creative process and grading varies from editor to editor, but there are certain looks that give video certain feels such as using orange tints to convey warmth; increasing contrast to show suspense; adjusting lighting during a different type of day; and countless other possibilities.


Order of Operations:

1. Remove artifacts and de-noise.

2. Balance your shots by adjusting BLACKS/MIDS/WHITES, SATURATION and WHITE BALANCE.

3. Relight within a shot using power windows or masks.

4. Add gradients, diffusion and other lens filters.

5. Add vignettes

6. Grade your images

7. Simulate a film stock of your choice

8. Resize and sharpen

Work Log:
I worked on animating and editing my outer space earth logo all week in Adobe Premiere Pro.

Monday, December 11, 2017

Moonrise Kingdom


Moonrise Kingdom Review

In 2012 I remember laying on my parents’ bedroom floor when they decided to watch a new movie that recently became available on onDemand. It was the first time I watched “Moonrise Kingdom” and artistic coming of age story about an orphan khaki scout named Sam Shakusky and borderline psychotic Suzy Bishop. The movie is directed by Wes Anderson who is most well-known for his distinctive visual and Narrative style, specifically his use of flat space camera moves, obsessively symmetrical compositions, knolling, snap-zooms, slow-motion walking shots, a deliberately limited color palette, and hand-made art direction often utilizing miniatures. This makes his works extremely intriguing to younger and old eyes because of its beautiful aesthetic. All these years later and “Moonrise Kingdom” still has a special place in the back of my head so I decided to rewatch it.

Due to their circumstances a twelve years old boy and a girl who fall in love with each other runaway from their homes. At the beginning of the movie 'Moonrise Kingdom' produced by Wes Anderson the viewer sees Suzy's home and a first impression of the relationships between the family members. After that you get to know about Sam's surrounding who lives in a scout camp right now. The camp master embodies discipline and strength. All children have to wake up to eat breakfast. In this moment they noticed that Sam is missing. He left a note in his tent which says he left the camp and he will never come back. The scouts start a posse to find Sam. Meanwhile captain Duffy Sharp who helps to find Sam contacts his previous foster parents. In this conversation the viewer catches a lot of information that Sam has emotional problems and is not longer welcome in the house of the foster parents. Sam and Suzy, got to know each other on a theater play, meet on a meadow to escape together to an unknown bay. On their adventure trip through the nature Sam takes care of Suzy that she does not hurt herself. They converge and begin to trust each other. In the meantime every scout khaki, the police as well as Suzy's parents are looking for the two adventurers. Thereby the relationship between Suzy's parents and their attitude towards their own daughter becomes obvious. When they are found by the scout khakis they defend themselves and manage to flee to their secret bay. Out there Sam and Suzy enjoy their togetherness and come closer. In the next morning the scout khakis find them again in their tent and they have to go back. Both become separated from each other. Sam is threaten by going into the orphanage and Suzy's mother reacts uncomprehending and prohibits any contact to Sam. Before Sam has to leave to an orphanage the other scout khakis start to think about his situation. Their result is that Sam is not so different from themselves and that everyone has blemishes. They resolve to help him to flee again. Together with Suzy Sam and the scout khakis flee to St. Jack Wood Island where Sam and Suzy get married. All children hold together. The situation gets out f control because everyone is looking for the troop. Plus, the long-awaited storm arrives. Sam and Suzy's last chance to escape is to jump from a building, but Duffy Sharp save them by telling that he adopts Sam. In the end the viewer can see Sam hanging around at Suzy's place. When his new adoptive father picks him up Sam says to Suzy: 'See you tomorrow!'.

There’s a lot of great performances from known actors in this. Bill Murray delivers a great performance as Walt, Suzy’s father. There’s a certain sadness to Walt that Murray really brings to the screen. The way he speaks, moves, and just the way he looks evokes a sense of disappointment. Murray also plays off co-star Frances McDormand (who’s also quite good in this) very well. Not to mention several of the film’s funniest bits come from Murray. Edward Norton delivers one of the best performances in my opinion. It’s hilarious seeing Norton play such a goofy character with so much conviction. Goofy as his character is though, there are points where you really sympathize with him, and eventually respect him. Bruce Willis is great as a lonely police captain, and actors Jason Schwartzman, Tilda Swinton, and Harvey Keitel all of very fun cameos.

What I didn’t expect to realize the second time around was the quality of performances from the child actors. Jared Gilman and Kara Hayward are both great as the lead protagonists. Both are very likable, and they have good chemistry together. You root for them to succeed throughout the film. I also like how the film didn’t avoid the darker sides to their characters. Likable though they may be, these are two seriously disturbed children, and the film never pretends that they’re not. The performances from the other children in the cub scouts are also solid.

Stylistically, this film has a lot going for it. There are several impressive tracking shots, but almost every shot has something interesting about it. I also really like what Anderson and cinematographer Robert Yeoman did with the color scheme. Some scenes had an almost golden like shine to them, while the film’s climax had a really cool dark blue thing going on.

All in all I would rate this movie up there with my all time favorites. As a kid I enjoyed the movie because it was abstract and different but I never understood the true darkness behind all the humor until I rewatched it. The cast, script, soundtracks, and director made this film nearly flawless.

Work Log:
Monday- No School
Tuesday- researched and watched videos of how to set up and use a lavalier mic to its full potential. I also went around the school to get some B-roll footage in case I need more clips later in the project.
Wednesday- Mr. Bomboy taught me how to use the lavalier mic including setup and which cables to get and attach it to. Then I got my camera, sd card, mic and chords, and tripod and went to the studio and set up everything. Then I recorded myself talking with the mic on.
Thursday- I downloaded the footage I got yesterday and listened to the audio which was a little rough even with the mic. So, I worked on manipulating the audio and adding a few affects to get rid of background hum and audio grain.


Friday- Today I storyboarded what angles I will get of Jack when I shoot the interview and what shots I want to capture of him playing his music.

Sunday, November 19, 2017

Photoshop

Photoshop Investigation

I have never used photoshop before so this week was all new to me. It kind of reminded me of the old painting app on dell computers but was obviously more advanced and much less straight forward. I struggled for a few days as I felt my way through the program, eventually I turned to watching youtube videos in class and at home to further expand my understanding and give myself a background before I started this project. I've always found making logos to be one of my favorite things and I enjoyed learning a new way to make them on a new application.

My idea is completely original. I did watch numerous videos on how to create logos but I wanted to make something that I came up with, not just following the steps of another person's ideas. I did learn a lot about some common themes with digital logos, the first being a shape that encloses the text. This defines the area that you want viewers to look at and gives a kind of unity to the project. Rather than just having text, by adding a shape, the logo becomes more complex and professional. Secondly most of the logos had some kind of emblem, I wanted to make one but I found it extremely difficult to work with shapes in the unfamiliar program. I also noticed that some logos had one or two letters that were bigger than the rest and kind of acted as the logo. So instead of just frustrating myself with messing around with shapes I went online, found a really cool text that made the letter "A" look unique and i downloaded it into photoshop. The font made the letter so different that I used it as my emblem. I then attached the two D's to the "A" ad to each other. I had to make a bar out of i's in order to fill the gap at the top and connect the two D's. Then I added the "LIFE ON" part and thought I wanted to put in somewhere that connects it to the rest of the project. Understanding that people read from left to right I wanted to incorporate the words on the left side so people would read the logo as "LIFE ON ADD" instead of some other wording. I also did this in order to avoid any confusion in that respect.  So I put it in the letter A which brought the words together and into the piece while also keeping them to the left side.

I was relatively satisfied with the basis I ha created so far but I realized it looked flat and not really up to par with other works I looked at. So I added depth by duplicating the words and letters, placing them behind the previous layers, and changing the color to a dark blue/grey, my favorite color. It was starting to look better but I wasn't satisfied, I had this great gradient on my background but the text still didn't really look 3D so I did some research on how to make shadows. I do the idea of the eclipse shaped shadow by one of the logos that I looked at but I didn't know how to create it. My research failed in offering me a solution to my problem so I continued to mess around with the program. First I tried drawing out a thin eclipse and feathering it out but it didn't give me the effect i wanted. So naturally I asked my teacher and he showed me that by double clicking on a layer a panel shows up, in the panel it gives workers numerous options on how they can edit the appearance of a layer. One of the options was a drop shadow, so i applied it to my eclipse layer, dropped the show lower from the layer, moved my shape out of the screen so it wasn't in the frame, and finally feathered and smoothed out the shadow to what I desired.

Worklog
Monday: Today I started to fool around with photoshop but was frustrated because i couldn't find the tools I was looking for and didn't really know how to use them
Tuesday: I looked at youtube videos on how to create logos in Photoshop and started to become more familiar with the application.
Wednesday: I went back to messing around with photoshop and found it much easier to create something with my new knowledge. 
Thursday: I did some more research at home and started to draw out ideas that I wanted to make in Photoshop. However when I got to class i ditched everything I planned out and just had fun creating. By the end of the period I had the large "ADD" letters down and the "LIFE ON" part in the "A". I also made a background with a radial gradient.
Friday: I finished the Logo and am planning on animating it in illustrate next week. I added depth to the text, added the box, and put a gradient on the "A"

Monday, November 13, 2017

Lavalier Mics

Lavalier Microphones

About Lavaliers:
Lavalier Microphones are also known as a lavalier, lav, lapel mic, personal mic, collar mic, or even a neck mic. A microphone is an instrument for converting sound waves into electrical energy variations, which may then be amplified, transmitted, or recorded. Specifically, a lavaier microphone is a small microphone that attaches to a subject in order to allow that person to have their hands free while they are talking. It is used when the normal aesthetic of a visual microphone is not wanted, typically in movies, tv shows, theaters, and even in public speaking applications. Usually the microphone is attached to a small clip that allows someone to clip it onto their shirt or jacket. Some lapel mics can be wireless, however, they are expensive so most people use ones with wires. The wire can easily be hidden under the speakers shirt or jacket or can be manipulated so it is not in the frame of the camera shot.

History:
The lapel microphone dates all the way back to 1932 and the device ranged from suspended microphones on a belt around the neck in 1941, and telephone operators and air traffic controllers using microphones that rested on the chest and were secured by a strap around the neck. In the 1950s, some microphone models were officially designed to be hung on a string around the neck.Some of the mics were made with condenser diaphragms, ribbons, moving coils, and carbon buttons. The name comes from a small microphone that could be hooked into the buttonhole of the lapel of a coat. The term lavalier originally referred to a pendant worn around the neck. Its use as the name of a type of microphone dates from the early 1960s.


How do mics work:
https://youtu.be/PE6Qn4ZiEyo

Work Log:
Monday: watched a few youtube documentaries on ADD
Tuesday: Worked on question sheets for interviewees
Wednesday: Worked with lavalier microphone on camera
Thursday: Worked on question sheet for interviewees again
Friday: Storyboarded B-Roll footage ideas


Monday, November 6, 2017

Mp1 summary 2 week 2

MP1 Week 2 Presentations Summary

Tessa-Film on Anxiety
Tessa is currently working on a film about human experiences. This year she wants her concentration to be on human experience and how they shape people. The film she is working on is about anxiety and how in a normal, everyday situation and person with anxiety can be in these situations and experience a severe anxiety attack. The film takes place in a classroom and a student with anxiety gets called on to answer a question in class, being called on provokes the anxiety attack. The thoughts of the character will be displayed on the screen so they are visible to viewers. And as the anxiety attack intensifies and subsided the thoughts become more or less extreme with the characters emotions. She also wants to incorporate the sound of a heart beat as the audio and wants the heart beat to speed up and slow down with the anxiety attack. She basically wants to make a film that allow viewers into the world Of someone with anxiety and to visually show what an anxiety attack looks like to the victim

She has done a lot of research  and planning in order to get the film right. This includes her research of different colors that represent panic, camera angles that create suspense, and numerous other techniques that can evoke anxiety into the viewer. So far she has done blog posts on these things and also has started to plan out her shots and storyboard. On top of these she has also written a script. One of her challengers so far has been finding enough people to fill the space in the background of the film in order to make it look like an actual classroom. I too have had problems with finding people to film so I can relate to this struggle.

Overall I think she has done a lot of research and she is doing everything on her own. She’s made more progress on her own then other people have who are part of bigger groups. I’m excited to see how the film comes out and how she incorporates all these ideas she has into it.

Worklog:
Monday-presentations and notes
Tuesday-presentations and notes
Wednesday-ended presentations and notes. And then watched YouTube videos on camera setting involving quality of video because I’m still having problems with my camera at home.
Thursday- researched how to use a lavalier mic so I can use one in my next interview and not worry about wacky audio.
Friday- absent


MP1 Presentation Summaries

MP1 Presentation Week 1

Trevor/Tyler/Noah-Film Project Summary
This group is working on a film about a high school male student who attends a party and subsequently becomes addicted to drugs. The film apparently does not glamorize drug use but rather teaches a lesson abut the dangers of addiction. Some things that the group has been researching last marking period is the use of the multi-cam technique. This is when multiple cameras are use, usually three, in order to capture different angles in the same scene so you only have to shoot once. I myself have explored this idea and will most likely be using the technique in my next film. I could probably ask this group to help me set it up since they too have researched the topic and I will need extra hands on set.

Trevor, the group member who focused on multi cam, also looked into script writing along with fellow group mate Noah. They said that they found it hard to come up with ideas for the films alone but since they were working in groups it made the process easier because their were numerous brains working together and adding suggestions and ideas. I am a solo team so I have yet to work with anyone, however, I don’t find it hard to come up with films because I have quite and imaginative mind. But I do enjoy peer review and to get tips after I have made the film so I can improve my next one.

Tyler another member researched directors and actors to take his understanding of on screen performances to the next level. I found this surprising since this was a digital class and not really acting. But I guess it does play into the quality of the film they are producing and is a major aspect in making the film look cinematic. Tyler also feels uncomfortable in front of a camera so a lot of this marking period was done to make him feel more comfortable and to help him portray a character that’s is relatable and can satisfy the viewers.

Overall interesting bought the group has made a Some progress over a long period of time. They’ve had months to work and haven’t even come up with a title for the film. I don’t know if they aren’t showcasing all the work that they have done or this is all their work but it’s not that much for how many people they have. The planning process can take a long time and hopefully they now know how to get it done and next time it will be quicker. Their presentation of their work was ok. Nothing special but not bad. I’m excited to see how they make this film and to see how they made it with in school limits when they have such an intense topic.

Worklog:
Monday-presentations and notes
Tuesday-presentations and notes
Wednesday-presentations and notes
Thursday-presentations and notes
Friday- presentations and notes

Thursday, October 19, 2017

Marking Period Blog Post


Life on ADD
By Brice McInroy


Life on ADD is an interview styled documentary about what its like living with Attention Deficit Disorder, told From successful business woman Dr. Elizabeth Bergey, and produced by amateur cinematographer Brice McInroy. Dr. Bergey has had ADD her entire life and knows all too well the many disadvantages, and few advantaged of living with the disorder. In this 6-minute interview she gives viewers a brief glimpse into her life on ADD.


Exploration of Ideas
Throughout my life I've had an itch inside me that never seems to go away. It nags at me and stings until I finally scratch it. That itch is my need to discover and explore new information, and to keep digging until I understand that topic fully. The constant need to keep my brain running and my want to gain knowledge has led me right into this film style.
The idea didn't occur to me until the start of school this year. I spent a long lethargic summer creating meaningless travel films, that were actually documentaries in their own form. But it became repetitive, similar, and overall boring. Id start a project and realize I was capturing the same shots that I had in previous films. I was becoming tired of landscapes and scenery. So I came into class with an open mind. Then one of the first films we watched in class was an animated documentary over a recording of an interview with an alcoholic, drug dependent, former artist called "Ryan" by Chris Landreth. My need for something knew, my exposure to the film and my hunger for exploration combined in my head and from that point on I was sold on creating Documentaries.
I myself have severe ADD or Attention Deficit Disorder and there for I was really curious to see how the disorder affects other people. So an idea started forming in my head, What if I created a documentary by interviewing people with ADD? And so I began to obsess about what I was going to do and how I was going to do it, and that helped my itch fade away as my void started to fill with new information.
Below is some information I researched in order to start my journey to create a documentary.

Planning/Production

I started the project by researching different documentary styles and watching countless of them. I
began to jump from idea to idea in an organized and scattered way and it was extremely unproductive. I was like a puppy trying to play with all the toys at once while also picking their favorite. First I wanted to do a animation in light of recently watching "Ryan", but I quickly found out that drawing on a computer was not my forte. So then my interest shifted to docudramas, where a true story is told from false characters and settings. I worked with that for a little and more ideas started to shape in my head. As I was watching "Trophy Parents" a documentary about crazy parents of athletes I noticed the mixture of interviews, action shots, and other cinematic scenes. I liked the way voices flowed over changing clips and thus spurred my final project idea. I was going to interview people with ADD, while also capture who they are as a person outside of the interviewing room.
I began to draw out story boards and different angels I wanted my camera/s to be at while filming my subjects. Reality hit and I realized I was a one woman crew and could only use two one camera at a time while filming. So I went back to my drawings and picked a classic interview style close up where the subject is lined up using the rule of thirds.

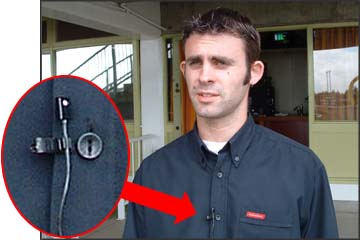
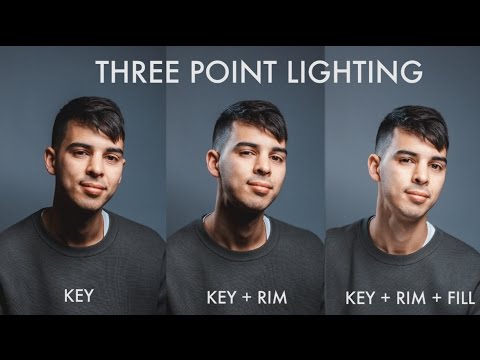
Then I wanted to work out my lighting, so I researched different interview lighting techniques and where to place lights, and I also made a blog post about it. Unfortunately, I did not have any soft lights or fancy light boxes at my house so I improvised. I took a cardboard box, cut out the flaps, put an LED light facing the opening, cut out a hole in the back for the wire, and then covered the front opening with a pillow case to defuse the light. It worked out really well for my fill light because it didn't illuminated the background that much, especially when it was placed close to my subject. Then I used a regular desk pointer light for my key light. This also worked out well because I was able to point it at my subject and only my subject, once again leaving the background almost completely dark. But I wanted to see my background or else the shot would look bland so I turned on a bed side table lamp in the back which acted as my back light and gave a nice glow to the background.
The Backlight I used also went with another topic I studied which was creating a blurred background and Bokeh Effect. The Bokeh effect is when a camera is out of focus and there are lights in the frame, because of the blur the lights defuse and create soft circles. With this in mind I previously planned to include the Bokeh Effect into my blurred background, and the bed side table lamp seemed to have achieved this effect.

Another thing I did while planning and producing was conduct a sheet of Interview questions I might ask during the film. I wasn't going to read off the sheet like a script, but rather refer to it if the interviewee got off task, or if my mind blanked for a second or two. This I found was extremely useful because it got into my head what I was trying to achieve with this film which was to share the story of a person with ADD while also educating the viewers and giving them a glimpse into my subjects life.

Evaluation/Integrating
I didn't use a lot of previous knowledge for this film other than basic camera settings and techniques and my understanding of what its like living with ADD, which I had to constantly remind myself to not allow my own personal experiences get in the way of how I was going to illustrate my subjects experiences. However, I did learn a lot while planning, producing, and editing this film. I learned countless techniques to shoot an interview. I think the most important was the use of multiple lights and cameras. I was only able to use one camera because I was limited by my resources, but through watching other interviews and documentaries I saw the importance of using switching from one camera angle to the next while a subject is talking. I really like how easily films flowed when producers used this technique. Next time I shoot an interview I will try to get a camera crew together so that I can achieve this style.

Another really important thing I figured out while editing was how to clean up audio and get rid of background noise. I shot my interview with a shotgun mic which unfortunately picked up a lot of humming from the fan and air conditioning. I know for next time that in order to avoid this then I would have to use a lavalier mic. But I had already shot the same interview two times because of other complications and I did not want to shoot it another time. So, I looked up how to get rid of background noise in adobe audition. I was presented with numerous solutions to which all I tried and failed. I was spending hours trying to fix this major problem and was trying to find solutions on the internet. But I couldn't, none seemed to work. So, I took my opening audio clip into adobe auditioned and started to familiarize myself to the app. Countless hours of messing around and I started to understand the inner workings of audio and sound. I then created my own solution to the problem.

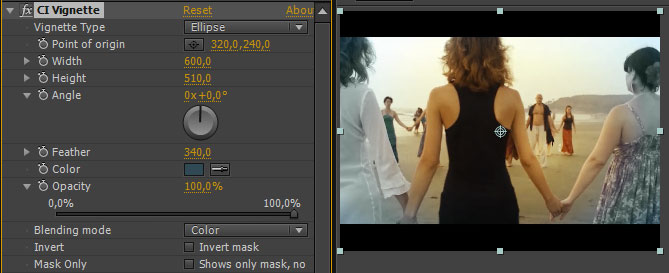
I selected an individual audio clip in Premiere Pro> went to "edit" on my tool bar> pressed on "edit in Adobe Audition. This brought my audio clip up in the audition app and allowed me to edit that part of my audio. Then I highlighted a section in my clip where all you could here was the background buzzing that I was trying to eliminate. I then clicked on "effects", scrolled down to "Noise Reduction/ Restoration", and clicked on "Capture Noise Print". What this did was save that highlighted section so I could use it later. Then I went back and highlighted my entire audio file and went back to effects>Noise Reduction/Restoration> and then to right below "Capture Noise Print" to "Noise Reduction Process". This brought up a separate panel that looked like a scatter plot with three different colored points. (See picture) I then had to manipulate the solid line, much like how you would manipulate a RGB curves line while color grading, until then yellow and green lines overlapped. This is would get rid of the background buzzing and only slightly warp the voice of my speaker. Basically by saving the humming sound I could put it into this program and line it up with my entire audio clip, which would then delete the humming with in that audio range.

I've learned not only techniques, styles, tricks and tips about interviews and documentaries through making my own, but I've learned how to solve my own problems and learn from my mistakes which I think is one of life's most valuable lessons. I've gained so much knowledge while planning, producing, and editing that I am beyond excited to put that information to use in my next film, and to fix those problems I previously encountered.


Monday, October 16, 2017

Worklog 3

Weekly Worklog #3

Monday- No School

Tuesday- Absent

Wednesday- I've been having a lot of trouble with my camera at home. I shot the interview 2 times already and each time my footage is coming out grainy and pixelated. So today I researched ways to fix this including, adjusting iso and aperture, and am going to try them out tonight.

Thursday- After another unsuccessful shoot with my camera at home I decided to check out one of the cameras from the school, along with a wide lense to get a nice blurry background. I spent the class messing around with it and seeing how the auto focus and manual focus works and how blurry I can get the background. Hopefully this will work and it will be the last time I shoot this interview.

Friday- Absent

asking questions and interview styles investigation

Asking Questions and Interviewing Styles Investigation

Below is a chart I constructed that shows different Interviewing styles and techniques and how to ask questions. I made it as a chart because I wanted to make it easy to read and refer back to incase i need a refresher or new ideas about questioning in interviews. I've learned the importance of coming prepared to interviews, while also being open minded. I've also learned the importance of fluidity and how and when to ask questions in order to allow the interview to flow easily and therefore make it easy to edit without jumping from topic to topic. I'm excited to use these techniques in current and future films. 
Curiosity
Come to the interview with an “I don’t know anything” attitude. Don’t show off what you know about the topic during the interview, rather lead with genuine curiosity. This usually produces the most honest and compelling answers. If you’re in doubt about how to structure an interview, chronological interviews are best, where the subject is unraveling events according to a timeline. This gives you plenty of opportunity to encourage storytelling and ask, “what happened next?” or, “why was that?”
Listen up
The decision not to use narration in your film has important implications for conducting interviews. You will be listening for content and how that content can be shaped into a non-fiction story.

Come to the interview well-researched and with a list of questions, but know that your job is not to get through the list; your job is to listen closely to the answers. You’re in discovery mode. You’re learning who your characters are and how their stories will inform your documentary. As interviewees unpack their tales you’re also listening for clarity and understanding. If something is not clear to you, you know your audience will be scratching their heads as well. Ask a follow up question for clarification. If you zone out just waiting for your subject to finish his answer so you can ask the next question, you’re going to miss opportunities to explore more deeply. SO be aware because i know you have ADD and tend to zone.
Going Deeper
If a subject goes on a tangent with their answer, let them go. It could get scenic and interesting. And if you want to get back to the original question, it’s ok to ask it again. The best way is to encourage your interviewee to tell a story. In fact you can make it an interviewer’s rule of thumb that if you want to probe deeper beyond the facts, places and dates, ask your subjects to tell you a story, an anecdote and to give plenty of examples.
Feeding the Questions
There’s a lot of debate about whether a director should provide questions to interviewees ahead of time. Be prepared; some interviewees will insist on it. For subject matter experts this will be most useful as they can dig up the necessary information to give you a confident and accurate account by the time they sit down in front of the camera. If your interviewee is one of the main subjects of your documentary, submitting a list of questions might not be the best approach for mining authentic and emotional responses. If the interview turns out to be an engaging exchange, chances are your question asking will be more organic as you discover your subject’s story and your curiosity will likely take you beyond the line of questioning you had in mind.
Open-
ended
John Sawatsky, the renowned journalism teacher and interviewing guru currently training ESPN reporters, has this advice: “Keep questions short, to the point, open-ended — “yes” or “no” should not be a possible response.”

Open-ended questions help put your interviewee in explainer mode and avoids short, unusable answers. Sawatsky gives this example: “Instead of asking: ‘It must have been tough in the early years,’ ask: ‘What were the early years like?’”

Here are some of Sawatsky’s other suggestions for avoiding ‘yes’ or ‘no’ answers:
  • How do you know that?
  • What makes you say that?
  • What happened next?
  • What does that mean?
  • Can you give me an example of that?
  • What’s that like?

Monday, October 9, 2017

Weekly Worklog

Weekly Work Log


Monday- I finished up most of my idea organization and planning. I created a sheet that included essential questions to act during the interview and i also sketched out different camera angles and shots I could get.

Tuesday- I selected my favorite shots from my drawings and workout my lighting technique ill be using. I did some research and decided to use the 3 point lighting method since its used it most interviews. I then mapped out where I want my lights. I also got out a camera and put it on a tripod facing the green screen in the studio. Then I took notes and observed when Mr. Bomboy showed me how to use the lighting board in the studio and which lights were my Key, Fill, and Back lights. while also looking through the camera to see how it affects my subject's (Mark) face and shadows.

Wednesday- Today I watched youtube videos and tested out the Rhode Shotgun Mic which I have decided I will be taking home with me tonight in order to interview one of my subjects. I chose this mic today because its mobile, extremely simple to use, and doesn't require a second person to use. I didn't choose the Lavalier Mic today because id be too focused on the sound while filming than the film and I wont be going outside so a simple Shotgun Mic will work fine.

Thursday- Today I downloaded some of my interview footage into after affects to try and get rid of grain and visual noise I encountered due to improper camera settings while shooting. However it didn't work and I've come to the conclusion that I'll just have to re-shoot the interview

Thursday, October 5, 2017

Camera Settings Investigation

Setting up an Interview

Lighting- First turn off all artificial light in the room in order to see where the natural light is coming in. Then place lighting accordingly to subject and the feeling you want to give off to your viewers. Use soft light in order to make the subject look friendlier and respectful. Most filmers use soft light set ups for informative interviews or to try and make the subject look innocent. By using hard light a different feeling is presented, usually one of suspense and makes the subject look like a villain. One way of using hard light i by making a silhouette of your subject by placing the light behind them instead of in front. This masks identity and makes viewers want to know the face behind the screen. By using a hard light set up instead of soft you can also illuminate the face and create hard shadows and cuts that give off that villain vibe again. For my concentration project I will be using Soft light since I am retrieving personal accounts of life experiences and want to make my subjects seem familiar and friendly. I also will be using the 3-point lighting set up in order to fully illuminate the face.


ISO- Thursday afternoon I attempted to record my first interview of Dr. Bergey and capture her life account of living with ADD. But I didn't know my camera or many of the settings very well so I made a rookie mistake. My ISO was turned all the way up to 6400 which I have learned you should rarely ever shoot in. ISO measures the sensitivity of the image sensor. Normally a high ISO would be used to shoot in low lighting to make it easier on the camera to pick up video better. But in afternoon lighting and the use of a 3-point lighting setup my footage game out grainy with visual noise. The camera became so sensitive that it looked like colors were just freely moving across my footage when I uploaded it to my computer. Now I have to reshoot the whole interview in a lower ISO, lower than 500, in order to avoid visual noise, pixelation, and grain.
Focus- Obviously Focus should be on the subject during an Interview, but in order to get a professional looking clip the background should be blur. I have been using a wide lense with lower zoom. This type of lense is used to film and focus on close up objects. Which is perfect for my needs. First I place my camera on my tripod, lined up my shot, and focused on my subject. But I wasn't achieving the blended smooth background I was looking for. So I got on youtube and looked up ways to fix my problem. The simplest fix, zoom in and then focus. I went back to my subject, placed my camera farther back in the room, zoomed, and focus. By simply zooming and refocusing I was able to get a blurred background and achieved a really professional looking clip(until a screwed up my ISO).
If you don't have access to a wide lense or don't have space to zoom, but do have a green screen then you can climb through a loophole in order to get this affect as well. First you have to place your subject in front of the screen, adjust your lighting, and make sure your background is completely green. Then take your camera and go to the place that you want as your background. Point your camera, and then completely unfocused your lense so everything is blurry. You can either take a picture or take a video that is the same duration os your interview. Then go into adobe after affects, put the key effect on your original interview clip. Key out the green screen and place the blurry picture of video behind it. This can look really good or obviously edited based on whether or not your lighting and exposure match in both the clips.

Sunday, October 1, 2017

Weekly Work Log

Weekly Work Log

Monday- Today I watched short documentary and interview styled videos on youtube and took notes in order to better understand the techniques and themes of this film style.

Tuesday- Today I worked on a contract to give to my interview subjects that explains what i will be trying to accomplish with my film and how it will be set up. It also includes some guidelines for me and for their comfort during and after the interviews.

Wednesday- I worked on my contract and started drawing out different camera angles for the interview.

Thursday- Today I watched videos and took notes on the different available uses of gopros because they are so mobile. They also include a wide lense and I was learning the different settings i can manipulate and hopefully use in my films.

Friday- I was absent

Camera shots and tecniques investigation

Camera Shots and Techniques
Below are a few different camera shots, techniques, and angels that can help me make my films more cinematic. I've written it as if I was teaching myself how to create these looks so that I can come back to it later throughout the year and take ideas from this post while also relearning how to make them. I feel all these shots are doable and I'm excited to see how I can incorporate them into my films.

Static camera
If there’s interesting movement within the picture – like milling crowds of people, falling leaves or clouds moving – keep the camera completely still (use a locked tripod). Viewers will see the movement you want to show and won’t be distracted by the camera moving.

It’s usually best to keep the camera still when you’re showing important details and facial expressions. If a character is moving and you want a closeup, it’s easiest if you plan your sequence so that they pause at the point in the action when you’ll need to cut to the closeup.

Moving subjects
People can move in various different directions: left to right (‘along the X axis’), up or down (‘along the Y axis’), towards or away from the camera (‘the Z axis’). All of these have different meanings. Moving closer builds involvement (or threat); moving left to right is ‘natural’ for a main character on a journey; moving upwards suggests a struggle. So if a character is moving diagonally upwards from left to right – like Rocky running up the steps of the Lincoln Memorial – they’re heroically overcoming a challenge. Moving diagonally downwards, on the other hand, suggests uncontrolled, headlong flight.
Moving the camera
If there’s no movement taking place in the shot, you can use camera movements to make it more interesting, to add intensity, or to reveal things. The coolest camera moves are where the camera itself moves though space. These tracking, arc or crane shots look more interesting than shots where the camera stays in one place and pans (turns) sideways or tilts up or down.
Tracking shots
In these shots, the camera itself moves forwards, backwards or sideways. You can track in(move forwards) to move through a space, to build intensity in a closeup, to follow a character, or to show what a they’re seeing (a point of view shot). A track out (backwards) can reveal more of a scene, or a character can follow the moving camera. This will take practice as inexperienced actors or presenters tend to walk too fast.

Tracking shots usually look better if you zoom out or use a wide angle lens or adapter (especially if you’re using the camera handheld). You’ll be able to get closer, so the shot will look more dramatic and camera shake will be less obvious.

You can use a sideways tracking shot or crab to scan across a scene or to travel alongside a moving subject. But if you’re using a DSLR, be careful – fast sideways movement can cause a rolling shutter effect which distorts the image.

If you can borrow a wheelchair, a trolley or skateboard your tracking shots will be smoother. You can also put the camera in a carrier bag with a hole cut out for the lens.

You could also try an arc shot which moves in a circle around the subject. This is difficult to do but is a great way of showing the whole space, or all the characters in a group, without cutting between them.

Crane shots
Crane shots move the camera vertically, above or across the action. You can buy jibs – some of them, for small cameras, are fairly inexpensive – but they are big and cumbersome to transport. With phones and lightweight cameras, you can shoot crane shots by mounting a handheld stabilizer on a boom pole.

Aerial shots
Pro Cinematographers used to have to hire a helicopter to get good aerial shots, but this has got much more affordable with drones. Good drone shots take a lot of skill, though, and you need to be careful about safety. There are a lot of legal restrictions on them which vary between states.

Friday, September 22, 2017

Slow Motion Investigation

Slow Motion Investigation

Slow Motion is the slowing of time in a film, it was invented in the early 20th century by August Musger an Austrian priest. A term for creating slow motion is Overcranking which refers back to old fashion hand cranked cameras and how if early cinematographers wanted to produce slow motion, they would have to crank the camera faster to increase the fps.

The style is best achieved by filming at a higher fps or Frames per Second. By having more frames when you edit the footage and slow it down you are given a clean, smooth, slow motion video. It can also be created by taking normal footage and slowing it down but the results can be choppy based on how much you slow it down. Film is created by taking pictures, lining them up, and playing them at a fast speed. A clip with low fps that is slowed down has wholes in the footage because a picture wasn't recorded at that exact moment so it must jump to the next. When increasing fps those gaps are filled because more pictures are taken in the same span of time. The higher the fps setting the slower you can edit a video with still getting a clean result. The one disadvantage of shooting in higher fps is that it takes up a lot more storage so you might need multiple SD cards when you go out shooting.

Slow motion itself is used to create drama in a film and to stress a moment in time. This can be a wide receiver catching a pass and scoring the game winning touch down, or the intimate moment between friends when they forget everything wrong with the world and just live in a moment and enjoy life. Another use is to illustrate Romance but I am not interested in that kind of slow motion for my films at the moment. I mostly wan to focus on everyday things that everyday people see, and not glorify sex and women and all that shenanigans.

An idea I have for my Concentration piece is to crest a documentary styled film about what it's like to live with ADD. I was to include flash backs in this film that occur in slow motion and emphasize the effect ADD can have on a persons social and cognitive abilities. I feel by really slowing down facial expressions and actions I'd be able to show viewers who do not necessarily know what it's like to live with ADD micro expressions of slow thoughts, distraction, and other symptoms of the disability.

https://youtu.be/JtNqRUwNmgc

I am committed to play soccer at university of Tennessee and I found this video and it's a similar style of what I want to do. In the video they are informing viewers of the new god technology that tracks how far players run, their vitals, and how hard a kid works. But instead of just a boring interview they edited in segments of practice and games. And slow motion video and cuts that all help to emphasize the need for this technology. By slowing down and seeing how serious and hard these girls work, the need for the technology become greater and it backs the creators claim. This is how I want to use slow motion in my project. I want to be able to emphasize the importance to acknowledge and accept people with ADD and see it as an illness and not an issue.